If you have engaged in coding to some extent, whether for your course assignments or a project, there’s a good chance you’ve encountered GitHub or Git. These are tools designed for keeping track of different versions of your code. Git is an open-source version control system that enables you to track all the changes you make to your file, revert to previous versions, and efficiently coordinate with your collaborators. GitHub is one of the many web-based code hosting and sharing platforms that use all the features of Git.
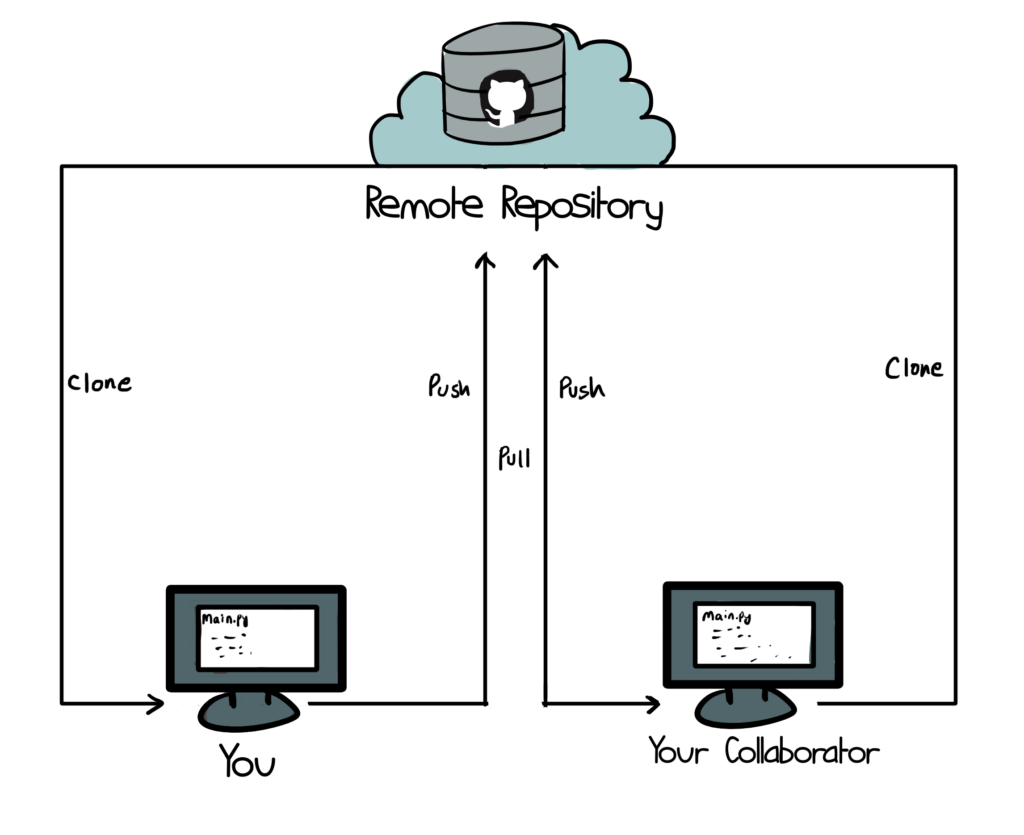
You can upload your code to GitHub’s cloud storage, make it publicly available online, and enable collaboration from anyone (See Figure 1). GitHub is highly popular among astronomers who develop software. Astropy, a Python package widely utilized in astronomy, has a GitHub page, and they actively encourage contributions from their users. This guide aims to introduce the basic mechanics of Git to get you started with version control.
Git Init
To get started with Git, you need to install it on your local machine first. The installation instructions for Linux, macOS, and Windows can be found here. Once you have Git installed, navigate to your project directory in your terminal and use the command git init to initialize your local repository (repo for short). The code in your local repository can now be uploaded to a remote repository like Github. Follow these instructions to add your code to GitHub (note that you need to create a GitHub account first). Once you are done, you have successfully synced your local repo to the remote GitHub repo.
If you want to work on a pre-existing Github repo, you can opt to clone it using git clone. Cloning creates a local copy of the GitHub repository, akin to downloading files to your local drive. With the cloned repository, you can make changes to the code and contribute directly to the original repository if you have the necessary permissions. If you lack permission to contribute directly, you have the option to fork it. Forking creates your own copy of the repository on GitHub. You can try to fork this example repo by following these instructions and then clone it to your local drive. We will use this forked repo to work with for the rest of the article.
Git add, commit, and push
With a local copy of your code synced to the remote GitHub version, you can begin making changes locally and reflecting those changes on GitHub. By default, you will be working on the ‘main’ branch in your repo. git status will show you the current stage of your local repository. Prior to making any changes, this should say that your branch is up to date with ‘origin/main‘ (see Figure 2).
Now, let’s start adding some changes to our local repository. We’ll create a Python file plot.py that has functions to plot some data. After creating this file, you’ll need to add them to the staging area using the git add command. The changes we made are in the staging area ready to “commit”. A git commit is like a snapshot of your codes. Every commit has a description of the changes made in the repo and it acts like book-keeping for all the revisions done on your code.
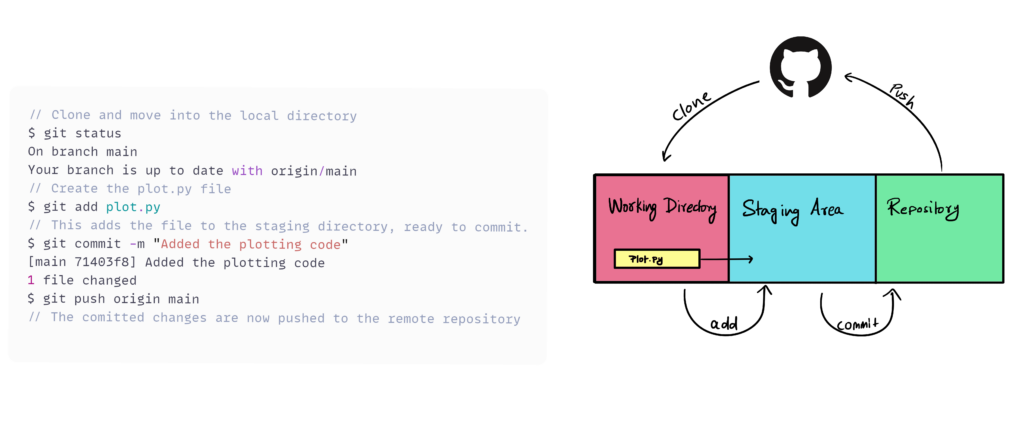
You can now incorporate this change to the remote repo using the git push command. git push origin <branch_name> will send your commit to the origin (remote repo). Since we are working on the main branch, we should use git push origin main (See Figure 2).
Branching out
Git allows you to branch out to separate versions of your code. The main branch serves as a pointer that references your latest commit. Each time you make a new commit, the main branch pointer advances. Now, let’s say you want to work on different code features parallelly, separate from the main branch. You can create a new branch using the git branch <branch name> command. This action creates a new branch pointer pointing to your last commit.
Continuing from our previous example, suppose you want to make a new branch to include a 3D plotting feature in the code. You can create a new branch called ‘plot_3D’ using ‘git branch plot_3D’. This results in the ‘plot-3D’ branch pointing to the last commit (refer to Fig 3a). Notice that we are still in the main branch, indicated by the ‘main’ pointer assigned to ‘HEAD‘. ‘HEAD’ is a special pointer that signifies the currently active branch.
To switch to the new branch, use git checkout plot_3D. This shifts the ‘HEAD’ from ‘main’ to ‘plot_3D’ pointer. After editing the plot.py file to make it include a 3D-plot feature, you can add and commit the changes. Note that this commit is now on a separate branch, distinct from ‘main’ (see Figure 3b).
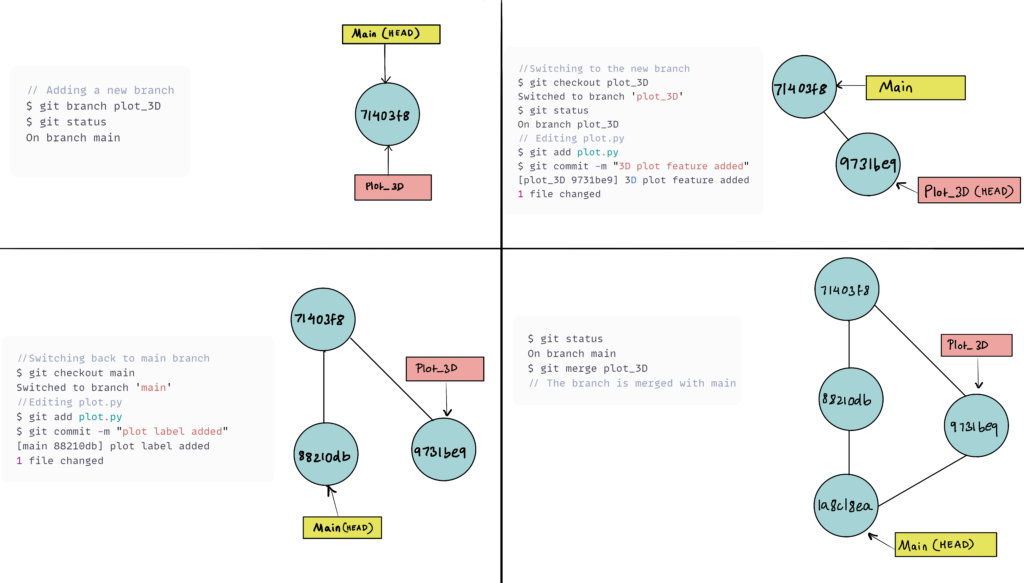
To return to the ‘main’ branch, use git checkout main. While on ‘main’, you can introduce some changes to plot.py. After adding the changes, you can stage and commit to the main branch. The git tree should now resemble Figure 3c.
Once you’ve successfully added the 3D plot feature on a separate branch, you can merge it back into the ‘main’ branch. While on ‘main’, do git merge plot_3D to merge the two branches. If there are no conflicts between the two versions of code in the two branches, Git will automatically make a merger commit. However, you will often encounter merge conflicts when different branches of the code have conflicting changes in the same code lines. In such cases, you will have to manually fix the conflict by editing the code in the respective branches before merging. After a successful merger, your Git tree should look like Figure 3d.
Branches are a very helpful tool particularly when collaborating with different people. Collaborators can work on different branches within the same repository and merge their work to the ‘main’ branch when it’s complete. This eliminates the need to exchange potentially large files back and forth, which can be cumbersome.
Commit to Git
While this guide covers most of the basic Git functions and commands, there is so much more you can do with Git. There are several useful guides online like the one by Github, that talk about other git commands. You can also refer to a Git command cheat sheet for quick reference. If you are ever confused about a particular Git function or command, you can consult platforms like StackExchange where many users post their queries and receive answers. Happy Coding!
Astrobite edited by Mark Popinchalk
Featured image credit: Pranav Satheesh
I’ll just plug the terminal program “lazygit” here. When you’re learning Git, it’s good to learn the basics of committing, pulling, merging, etc. by typing them into the terminal; it builds muscle memory. Once you’ve actually got the basics down, lazygit lets you do a ton of basic (and even intermediate) level actions with a few key presses, while giving you an auto-updating visual display of things like the state of your working repository, your branches, and their commit history. I used Git most of the way through my PhD and discovered lazygit sometime in the last year, and it just makes handling the basic low-level stuff so much faster and more efficient.