When you are managing years of research, be it observations, code, notes, or just random doodles, the primary challenge isn’t just storing the data. The real challenge is preserving the context that made it all meaningful in the first place. On Astrobites, we’ve discussed the importance of note-taking before and there is no shortage of apps designed for exactly that. I’ve tried many of them and especially Microsoft OneNote has held a certain spot in my heart for the last decade or so. However, a few years back I stumbled upon a cool new program that takes a different approach to knowledge management. What follows here is not an advertisement or argument for why one tool is better than the other. Nor is it a call to throw away your favorite app in favour of a new and shiny one (I actually still use OneNote a lot). Instead, this is meant as a brief overview and a collection of ideas for getting started with a tool you might find useful if you’re always looking for ways to optimise your workflow.
Meet Obsidian
At its core, Obsidian is a free application that functions as a sophisticated interface for a local folder of plain text files. Unlike many tools that require you to upload your data to a company’s server, Obsidian keeps your data on your own device. You can choose to use their integrated, end-to-end encrypted sync service for simplicity, but because your notes are just a folder of files, you are just as free to use GitHub or your own preferred (or university-mandated) backup system. Your notes are stored in Markdown, an open and universal formatting language that ensures they remain readable by almost any text editor, even fifty years from now irrespective of whether Obsidian is still around by then.
There is a great community around it, lots of guides and an Official Obsidian Help page if you get stuck.
The way Obsidian organizes information feels much more aligned with how we actually conduct research. Instead of forcing a note into a single, isolated category, you create a web of knowledge through internal links by just typing [[“Name of note you want to link to”]]. In my own workflow, this means if I’m writing a note about something specific, I can simply link it to my notes from related papers, other relevant things I’ve previously written down or a snippet of Python code I used for some analysis. Because these links work in both directions, I can always see a list of “backlinks” that show exactly which other notes reference the one I’m currently reading. This transforms a collection of individual files into a living network where the context is never lost, regardless of how large the project becomes.
This idea is neatly captured in how Obsidian provides a Graph View that visually maps out every connection you’ve made. When you open the graph, you see your notes represented as nodes in a sprawling, interactive map, with lines representing the links between them. You can see a small section of this graph from some of my connected notes in Figure 1.
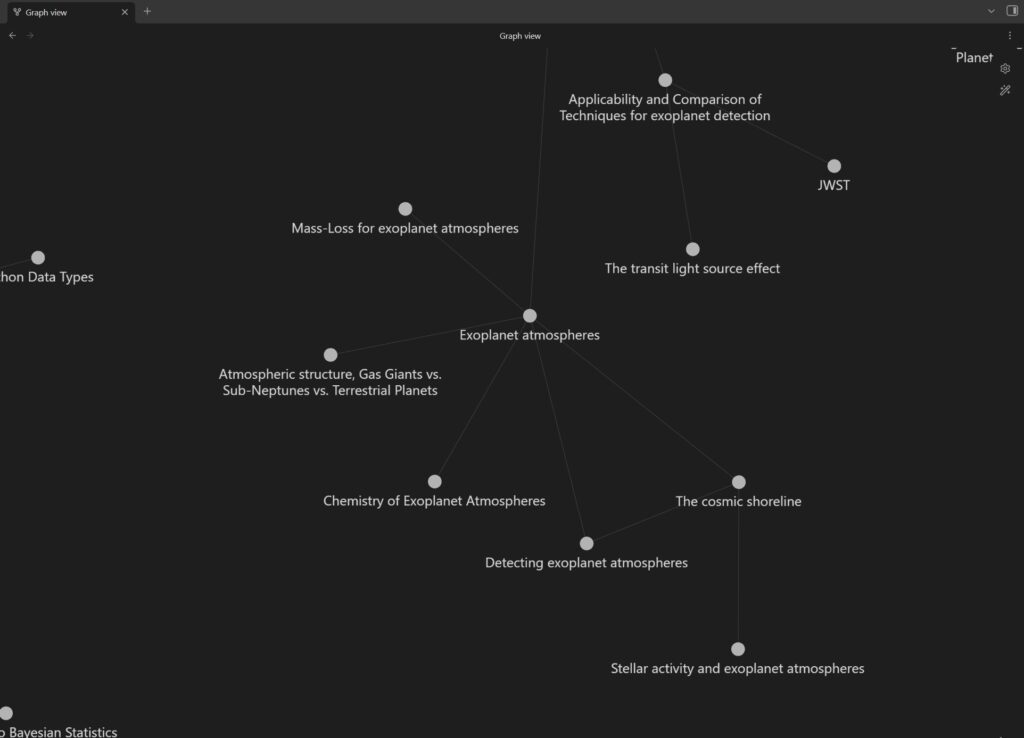
Figure 1: Obsidian’s network graph can help show you the links you’ve made between notes. By simply tagging or linking one note to another, you begin to see how your notes relate to one another. This “linked thinking” creates a web of knowledge where you can track “backlinks” to see every other note that references your current topic. It essentially builds a map of your knowledge and makes it easier to see the connections visually. You can also do a timeline and see how notes are added and connected over time. Neat.
One of my favorite features for navigating this network is the ability to preview notes without actually opening them. If you’ve ever found yourself falling down a rabbit hole on Wikipedia, clicking from one entry to the next, you’ll recognize the utility here. In Obsidian, you can simply hover your cursor over any internal link to see a small pop-up window containing the content of that note. This is really useful when you’re writing and need to quickly verify a definition or some other piece of knowledge from another file without breaking your train of thought or losing your place in the current document. It makes your personal collection of notes, known in Obsidian as a Vault, feel like a private, curated encyclopedia where everything you’ve ever written is just a glance away. In Figure 2, I am working in a note that is already part of a larger network. I can list other connected notes and check the content of any of them via a hover-link, all without ever being taken outside of my current note.
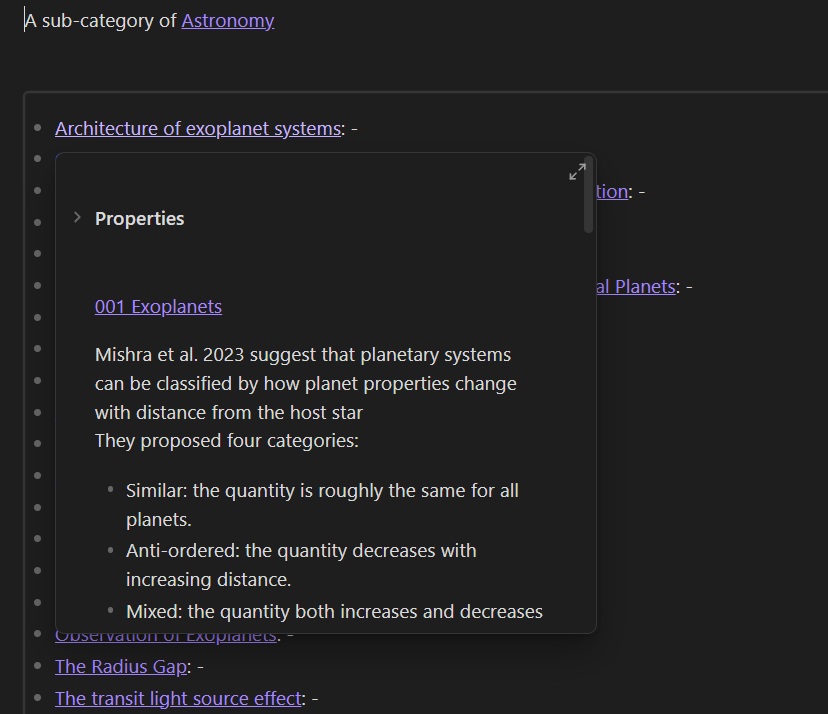
Figure 2: The figure shows a note in my vault that acts as a map of related notes. By hovering the cursor over a particular note, I can read through the note. The note itself is linked back to another map of content and the two will appear connected in the graph view.
How to get started and how to become a pro
There are many guides out there on how to get started with Obsidian, both in written and video format. Installing the app itself is straightforward and I would recommend just playing around with it for a bit. Your best friends are the command palette (ctrl/cmd + p) and the Quick switcher (ctrl/cmd + o). You can get really far by just launching either and starting to type to see what they can do. I’ve also bookmarked a markdown guide though you can get away without knowing any by using the right plugins (I’ll get back to that in a bit).
While playing around got me pretty far, I’ve picked up loads of tips from different sources. Linking your thinking runs a YouTube channel almost entirely dedicated to cool Obsidian features and workflows. Nicole van der Hoeven is also someone worth checking out in this space. The Effortless Academic often posts about Obsidian too. I particularly enjoyed this guide on how to style your links among many others.
There are many more out there but again, I recommend just following the official installation guide and start playing around with it to develop your own feel for it.
Suggestions for how to organize your notes
If you are still with me and haven’t gone on to play with Obsidian just yet, I want to share a few suggestions and tips and tricks that I’ve picked up over the years.
One neat thing about taking notes in Obsidian is the linking between notes, either directly or by adding tags (you can add properties to your notes with three dashes at the top of a note) . This means that instead of putting notes in a folder that just gets bigger and bigger (I tend to do this in OneNote…) you dynamically build the structure as you take notes. I learned to use MOCs, or Maps Of Content. These are hubs for your notes and can be linked together. So a note can live in several MOCs and you can chain these together. For instance, my note on exoplanet atmospheres (which links to several other notes and acts as an anchor for these) is linked back to a MOC for exoplanets which links back to a MOC for astronomy which links back to my home page with an overview of all areas of my Vault.
You can still make folders (and I do) but it helps you rethink what folders you actually need and makes your folders more about the type of note or its function rather than its content. An example is shown in Figure 3.
In my Vault, I have several folders. One, for instance, contains all my figures and images. This is because in Obsidian figures are not bound to a single note. Usually if you include an image, in OneNote for instance, then that image lives in that note. If you want it in multiple places you will have to include it again. In Obsidian, any time you add an image, it creates a separate note with just that image and you then display it in the other note that you are working on. All you need to do to include it elsewhere is reference back to that image note. I find this neat because if you make any changes, it automatically updates every single note where you used that image (and this works for links too, as long as you enable the option to automatically update internal links in the settings menu) . The size of the figure can be configured in the individual note while the original image keeps its original size. This also keeps the size of the Vault smaller. The note with the image lives in my image folder and I have it set up such that any image I add knows to add itself in this folder. Clean and efficient.
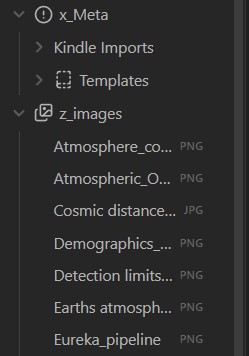
Figure 3: The figure shows an example of the folder structure in my Vault. Instead of organising notes based on topic (which is handled by linking and maps of content) the notes are organised by function, type or where I need them. A folder to handle raw imports before they are made into real notes or a repository for all my images used in the Vault are a great way to keep my collection organised.
If you want to try out a different scheme for how to organise notes in folders, you can check out the PARA method in Obsidian. Of course, you are free to do your structuring in any way you like – it’s your notes after all and as long as the system makes sense for your use case.
My favorite community plugins
Where Obsidian really shines is the community plugins. At the time of writing, there are close to three thousand different plugins available. This means that if you are lacking a specific functionality in Obsidian, chances are someone out there made a plugin just for that. Community plugins are completely optional. The Obsidian team maintains a collection of core plugins and you can choose to stick with those (they can actually be enabled or disabled individually based on your preference). However community plugins really expand functionality and they are fun to play around with. You can search for them in the settings menu once you have enabled community plugins. Here are some suggestions for cool add-ons that I regularly use.
I’ve often found myself needing to organise data in a table. While you can absolutely set up a table in Obsidian per default, Advanced Tables makes it easier to add, remove or switch around rows and align the content how you like it.
Citations allows you to integrate your academic reference manager directly with Obsidian to link and reference your literature notes straight from the command line.
Do you like to draw sketches, scribble down notes by hand or write on top of PowerPoint slides? The Excalidraw plugin allows you to do that straight in Obsidian.
When working with data and plots, I often find myself using a Jupyter Notebook. With Execute code I’ve been able to mimic part of that experience in my notes too. Obsidian can do code blocks with nice language-dependent formatting out of the box (just do three ticks “` in your note) but this little plugin can run the code and output straight in my notes.
Homepage is a personal preference. The idea with Obsidian is that your notes are fluid and connected but I like to organise it such that I always launch from a single homepage that I keep as sort of an overview of my Vault.
For added customisation, I use Iconize to add little icons to my folders. I’ve seen people colouring them too with the rival Iconic plugin but I like to keep it minimal.
As mentioned, your images are not bound to your individual notes in Obsidian. The Image Captions plugin allows me to link an image caption to the displayed image in whatever note I chose to display said image in. It even makes it look like it is part of the image. Cool.
A newer addition is Kindle Highlights. I read a lot on my Amazon Kindle and recently read The Last Stargazer by Emily Levesque (you can find an excellent review of the book here). The notes I highlighted on the Kindle took me three minutes to import into Obsidian… 543 milliseconds for importing using the plugin and about 2 minutes and 59.5 seconds for going to find my Kindle in my bedside drawer and plug it in. Obsidian and its plugins are lightning fast.
Painter is great for defining highlights to use in the text. You can input any colour hex code and save it as a custom marker with a custom shortcut.
Style Settings. This one I have only played around with a little. It enables you to overwrite the markdown style with custom CSS code. I’ve managed to change how bold and italic looks in my notes but I’m no CSS wizard. If you are an expert, I think you will appreciate just how powerful this plugin is.
Zotero Integration allows me to import highlights straight from my Zotero library. It works for me but I’ve heard that another plugin, Zotlit, might be the future here.
Lastly, I thought I would do some honourable mentions. While I use other programs for these functionalities, Tasks and Calendar are both popular plugins. They do exactly what it says on the tin. As a newcomer to Obsidian, remembering all the hotkeys and markdown language can be a little hard. If you prefer a button to press, the cMenu plugin is nice. You can also customise Obsidian with all the buttons that your heart desires with the Commander plugin.
I also thought it necessary to mention Dataview. It is one of the most popular plugins as it allows you to query your notes. Insanely powerful feature and I’ve used it a lot. The reason I wouldn’t include it in the list is that some of the functionality has been implemented with Obsidian Bases. While the plugin can still do more, it might just be a matter of time. A core plugin supported by the development team will always be more future proof and generalisable than a community plugin. I should probably start using bases instead.
There you have it. If you want to give Obsidian a try, I hope that this can save you some work and get you up and running quickly so there is more time to explore. There are a ton of other features like templates, canvas, publish and so many others not covered here that I leave to you to discover.
Are you already an Obsidian user? Feel free to comment below and share any cool tips and tricks you might have. I don’t think I will be abandoning OneNote just yet but I’m always looking for new ways to improve my workflow and Obsidian seems to offer endless opportunities for just that.
Astrobite edited by Serat Saad
Featured image credit: A graph view of one of my Obsidian Vaults